 In our New Patient Accelerator Program we show you everything you need to know to market your clinic, including setting up your Facebook Ads. So, in this article, I wanted to help you hit the ground running by making sure your ad account is set up and ready to go.
Believe it or not, some physical therapists want to get started with their ads immediately, without realizing that they don’t have anything set up behind the scenes.
This article is to make sure you have everything in place and ready for your paid advertising to start whenever you’re good to go.
If you’ve already got a Facebook Ad Account, then great! If not, don’t worry – I’ve got it covered. First, let’s begin by setting up your Facebook Ad Account using Business Manager.
What Is Facebook Business Manager?
This is a tool designed for managing your Facebook page(s) and ad account.
By using Business Manager you can manage access to your business page and ad account, see who has access and remove or change their permissions. If you have someone on your team who is going to help you run Facebook Ads, this is essential.
You can also use it to share your Business Manager account with agencies so that they can help manage and set up Facebook campaigns for you. We do this with people in our Agency program, meaning we don’t even have to login to a client’s Facebook account to set ads up for them – we can do it by requesting access to their ad account and page, so everything is kept in one place.
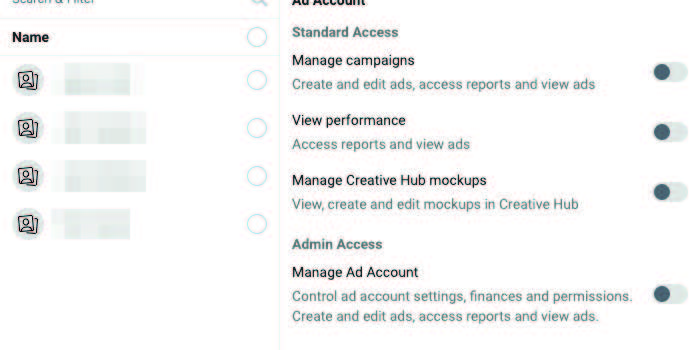
There’s also a different set of roles for your Facebook ad account that you can edit and manage in the Business Manager – Admin, Advertiser, and Analyst. To make it simple, you’ll want to assign yourself as Admin: the role with access to all features and allows you to set up ads with ease.
Next, in order to be running ads for your clinic, you need to sync your Business Manager account with your clinic’s Facebook page.
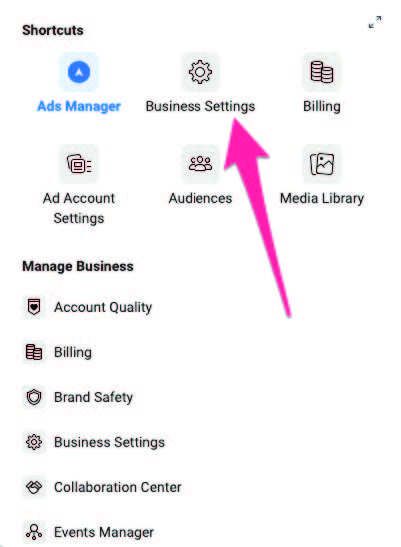
To add your Facebook page to Business Manager go to ‘Business Manager Settings’. Under the ‘People and Assets’ tab, select ‘Pages’. Click ‘Add New Page’ and enter your clinic’s page URL or name.
If you’ve been using the regular ads manager (not business) you’ll need to also connect your existing advertising account to your new Business Manager. To do that, open ‘Business Manager Settings’, and under the People and Assets tab, click on ‘Ad Accounts’. On the right side of the page select ‘Add New Ad Accounts’, then select one of the 3 options: ‘Claim Ad Account’, ‘Request Access to an Ad Account’ or ‘Create New Ad Account’.
If you choose to request access (which you will if you have an existing account), then enter your ad account ID. You can find this by copying the digits in the URL of your Facebook ad account on another browser.
Before you can start running ads, you’ll need to give Facebook additional account information and enter your payment details. Let’s cover that next.
Setting Up Your Ad Account Info
As you may imagine, Facebook won’t let you start spending unless you’ve entered a valid payment method and shared some information about your business.
To get this step sorted, go to Ad Account Settings in the Business Manager menu and fill in the blanks by entering your clinic’s name, address and other relevant information. See image right.
Note: If your practice is in the EU you’ll be prompted to insert your VAT number. Facebook will allow you to choose your billing currency and time zone. Be super careful when you enter this info as you won’t be able to change it once you’ve created your account. When you’ve filled in your ad account information, hit the save changes button and then move onto the next step…
Setting Up Your Billing & Payment Information
You’re almost there! I know this may sound self-explanatory, but navigating Facebook can be confusing.
So, to get your first payment card added to your account, you’ll need to head over to ‘Billing & Payment Methods’ in the Business Manager menu. When you’re in there you can add new payment methods, edit your current payment methods and set your account’s spending limit.
To add a new payment method, simply click on the green ‘add payment method’ button, choose the method you want to add and click ‘continue’. If you don’t want to use your credit card, Facebook accepts multiple payment options, including PayPal.
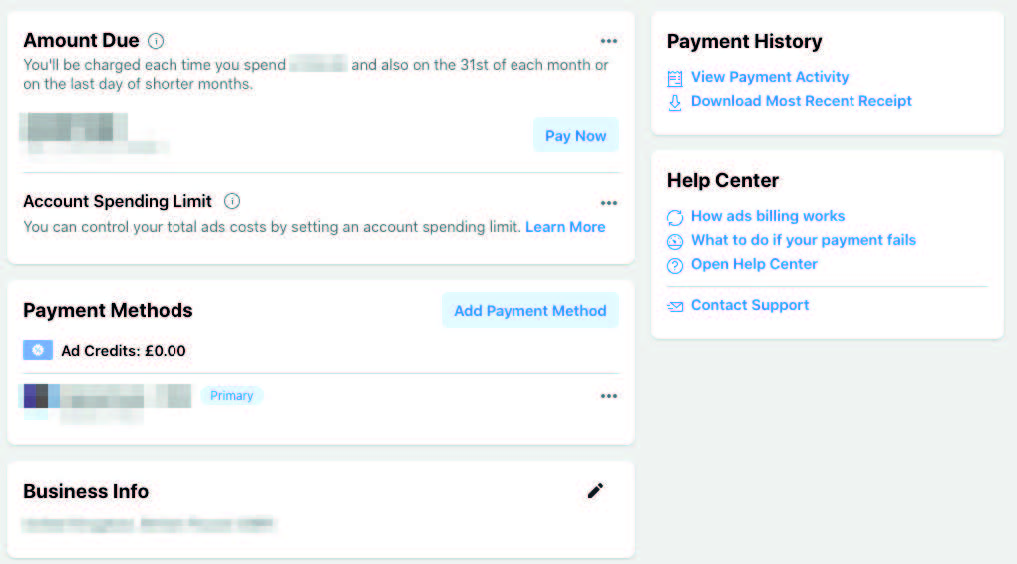
Pro Tip: as you start advertising more and more (and you shouldn’t ever really stop!) we suggest you add a secondary payment method. This way, should your primary card expire, reach the monthly limit, or be blocked for whatever reason, your ads won’t suddenly stop being shown to your audience.
If your primary card billing fails, all of your campaigns will be immediately paused until you pay the outstanding balance. You’ll also have to restart them manually – which is a complete time suck when you’re running a business! So, we highly recommend you have a second method set up just in case this happens to you. See image right.
On the same track as above, you can also set up a spending limit on your account, however I would advise against that. A lot of people may think it’s a good thing and something that would be beneficial to them, but having a spending limit on your account makes things much more difficult. For example, as you approach your account spending limit you’ll be sent emails and notifications to let you know that you’re reaching the limit, which is all well and good, but chances are you’re like most people and will ignore most emails Facebook sends you unless it says that your ad is disapproved.
When you reach your account spending limit, which can be at any time of day or night, everything in your account stops. All of your ads are turned off until you manually reset the limit. From personal experience, I can say that having an account spending limit on your account is more of a hinderance as you can go days without an ad running, just because you’re not fully aware of your spending limit has been hit.
My best piece of advice regarding spending is to carefully and properly plan out what you’re going to run on Facebook, so that you always know your budget. If you’re running 2 ads at $10 daily, then your monthly budget on Facebook Advertising will be around $600. As long as you keep track of your budget and what ads you have running, you won’t overspend.
And there you have it! Your ad account is ready to go.
Now that’s out of the way, your clinic’s Facebook Ad account is ready and waiting for you to set up your first ad campaign.
To quickly sum up: before running ads, you need to set up Business Manager; if you’re already running ads and need to transition, remember to connect your clinic’s page and existing ad account to your new Business Manager.
Having Business Manager means Facebook will prioritize your ads because they know you’re a business wanting to help people, and you have less chance of your account being shut down for accidentally violating their policies.
Are You Ready to Get Started Using Google + Facebook Ads for Your Practice?
Having a marketing plan and posting content is important - now let's put it into action and get real results. This FREE REPORT shows PT Clinic Owners how to get New Patients using Google and Facebook. It's perfect if you're looking to SCALE in 2021 and finally crack the code on acquiring new patients online.
In just 36 pages, discover the exact steps for adding $250,000 per year with Social Media Marketing (...spending as little as $25 per day).
Click the link below to enhance your clinic's digital marketing strategy today: